
In “Company” all details of the company, for which the Return has to be generated, is stored. In order to access the company details, click on “Company” under the “Setup” option:-


The list of all the companies that has already been defined in the CA-TDSMAN software is displayed here.
In order to define a new company, click on the Add button given at the top of the screen.

CA-TDSMAN software gives the option to import the new company(s) details through Excel Import by clicking at this option.
CA-TDSMAN software gives the option to import the new company(s) details through CSV Import by clicking at this option.
In order to Edit the existing data, click on the EDIT Button given at the right side of the screen.
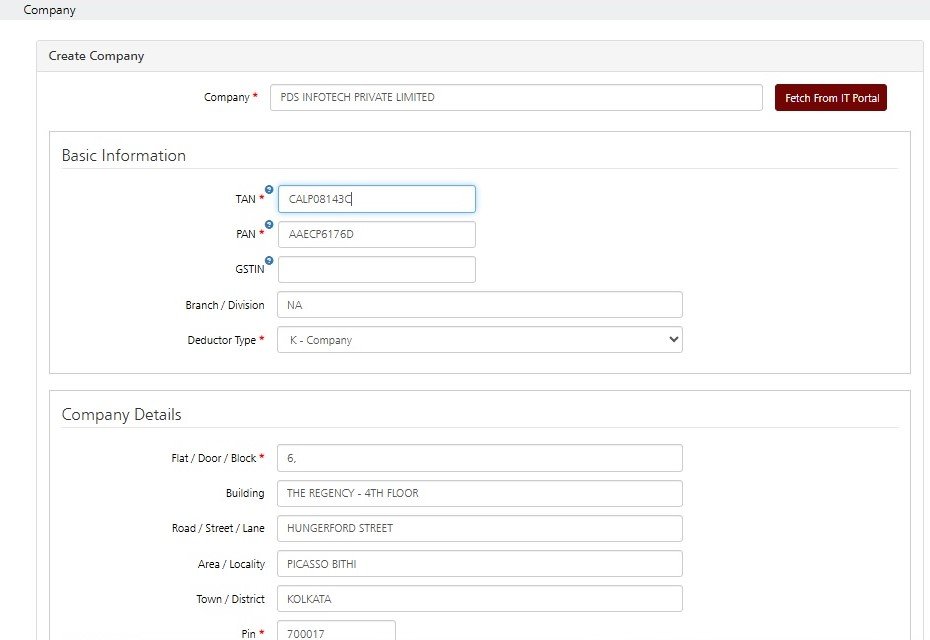
The entire company details screen is displayed and explained below :


In the above screens, there are self-explanatory fields against which the data has to be entered. Further, we can classify the fields into 2 broad following sections:
a) Details of Company : Enter the details of the company such as Company Name, TAN, PAN, Deductee Type, Address and other govt. details (if applicable).
b) Details of Responsible Person : Enter the details of the responsible person such as Name, Father’s Name, Mobile No., Address etc.
Brief description of each field is mentioned below
• Company Name
Enter the ‘Company’ name
• Basic Information
TAN (Mandatory) : Enter the TAN of the company.
PAN : Enter the PAN of the company.
GSTN (Mandatory) : Enter the GSTN.
Branch/Division : Enter the branch name or the division name of the company.
Deductor Type (mandatory) : Select the type of the company from the dropdown list provided.
• Company Details
Flat/Door/Block No. (Mandatory) : Enter the Flat/Door/Block No.
Building : Enter the building name.
Road/Street/Lane : Enter the name of the road/street/lane.
Area/Locality : Enter the name of the area/locality.
Town/District : Enter the name of the town/district.
PIN (mandatory) : Enter the Address PIN
State (mandatory) : Enter the name of the state.
STD (mandatory) : Enter the STD code of the company.
Phone (mandatory) : Enter the phone no. of the company.
Alternate STD : Enter any alternative STD No.
Alternate Phone Number : Enter any alternative Phone Number.
E-mail (mandatory) : Enter the E-mail address of the company.
Alternate Email ID : Enter any alternative E-mail ID of the Company
• Responsible Person
Name (mandatory): Enter the name of the responsible person
Designation (mandatory): Enter the designation of the responsible person
Father’s Name: Enter the father’s name of the responsible person.
Mobile No. (Mandatory): Enter the mobile no. of the responsible person.
PAN (Mandatory): Enter the PAN of the responsible person.
• Responsible Person’s Detail
Flat/Door/Block No. (Mandatory) : Enter the Flt/Dr/Block No.
Building : Enter the building name.
Rd/Street/Lane : Enter the name of the road/street/lane.
Area/Locality : Enter the name of the area/locality.
Town/District : Enter the name of the town/district.
PIN (mandatory) : Enter the PIN no.
State (mandatory) : Enter the name of the state.
STD (mandatory) : Enter the STD code
Phone (mandatory) : Enter the phone no.
Alternate STD : Enter any alternative STD No.
Alternate Phone Number : Enter any alternative Phone Number.
E-mail (mandatory) : Enter the E-mail address of the responsible person.
Alternate Email ID : Enter any alternative E-mail ID of the responsible person.
Govt. Deductors
PAO Code (mandatory): Enter the PAO code
PAO Registered Number: Enter the PAO Registration. No.
DDO Code (mandatory): Enter DDO Code.
DDO Registered Number: Enter the DDO Registration No.
State: Enter the ministry state (Applicable for State Government Deductors)
Ministry (mandatory): In the ministry options if ‘Other’ is selected then enter other ministry.
After entering all the valid data in the sections, click on at the bottom of the page. (Refer to fig-00).
Delete a Company/Deductor
In order to Delete the existing data, click on the Delete Button given at the right side of the screen.
Note: The company/deductor cannot be deleted if any Return is made against it.
Add Company Data Using Excel
Company data can be prepared in Excel Sheets and then imported into the system. This would save effort in entering data through formats of the software interface. Click on Excel Import :

The following screen will get displayed :

• Download Excel Format
Company data needs to be provided in a structured Excel format. In case the format is not available, this needs to be downloaded from Download Excel Format option.
After downloading the Excel format, the company details have to entered in the worksheet. It is recommended that after entering the data in the downloaded excel sheet, ‘Save’ the data with a different file name so that the original empty excel sheet can be reused for adding other company details.
Now, select this Excel file by clicking on ‘Choose File’. Click on ‘Validate Excel’

Click on lmport Excel button to upload the data in the system. (Please ensure proper format of excel file is used, otherwise it will display error) Following is displayed below:

Add Company Data Using CSV:
Company data can be prepared in CSV Sheets and then imported into the system. This would save effort in entering data through formats of the software interface. Click on CSV Import :

The following screen will get displayed :

• Download CSV Format
Company data needs to be provided in a structured CSV format. In case the format is not available, this needs to be downloaded from Download CSV Format option.
After downloading the CSV format, the company details have to entered in this CSV file. It is recommended that after entering the data in the downloaded CSV file, ‘Save’ the data with a different file name so that the original empty CSV file can be reused for adding other company details
Now, select this CSV file by clicking on ‘Choose File’ . Click on ‘Validate CSV’.

Click on Import CSV button to upload the data in the system. (Please ensure proper format of CSV file is used, otherwise it will display error) Following is displayed below:

Following screen will come

Click on “Close”
• Add Company – Fetch from IT Portal
This system provides the option to fetch the company data directly from the IT Portal. This saves human time and efforts considerably. In order to do this click on ‘Fetch from IT Portal’, as shown below :-

The following screen will get displayed :

Enter TAN – Enter your TAN number
Enter password for Incometax account – Enter the Password of Efilling Incometax account

Click on ‘Fetch TAN info’
The data will be fetched directly from the IT portal and get displayed, as shown below :

Click on ‘Save’
Need more help with this?
CA-TDSMAN - Support