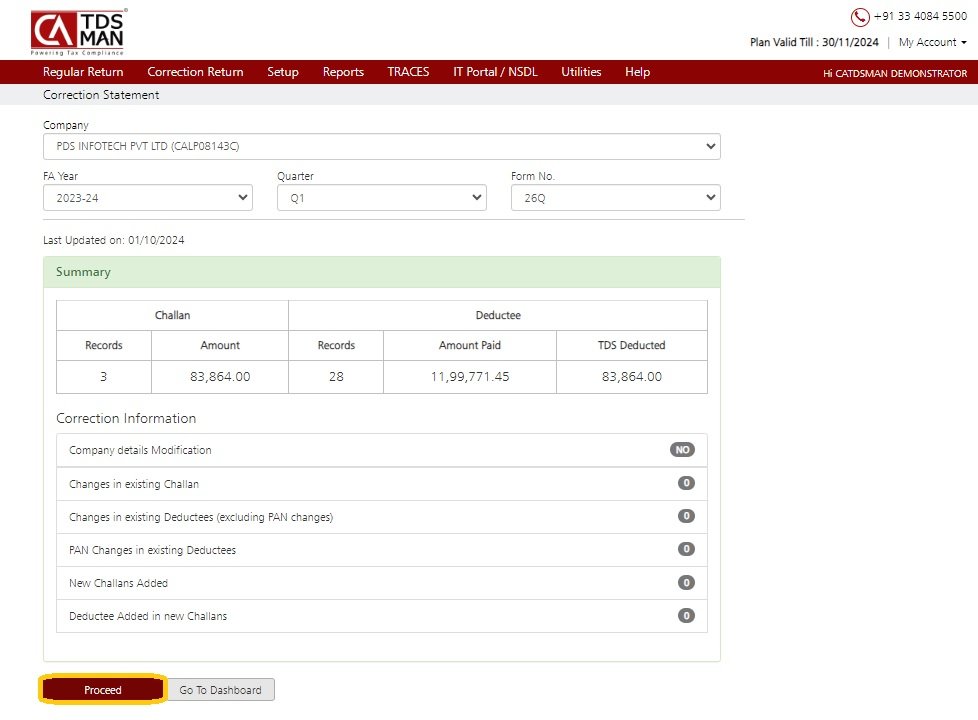
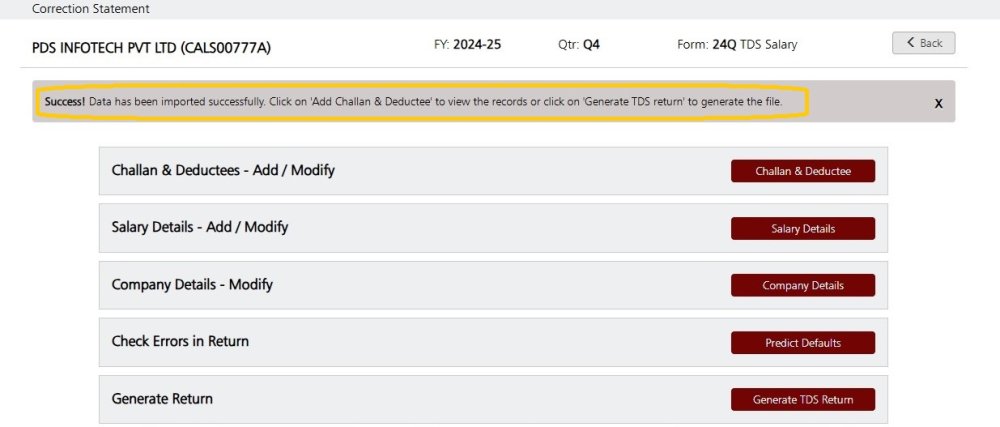
When The TDS file is imported to the online portal, click on Process to Correction Return. This will take you to the details of the Correction Return.
Following is displayed below:
The desired correction can be made by clicking on Proceed as shown above.
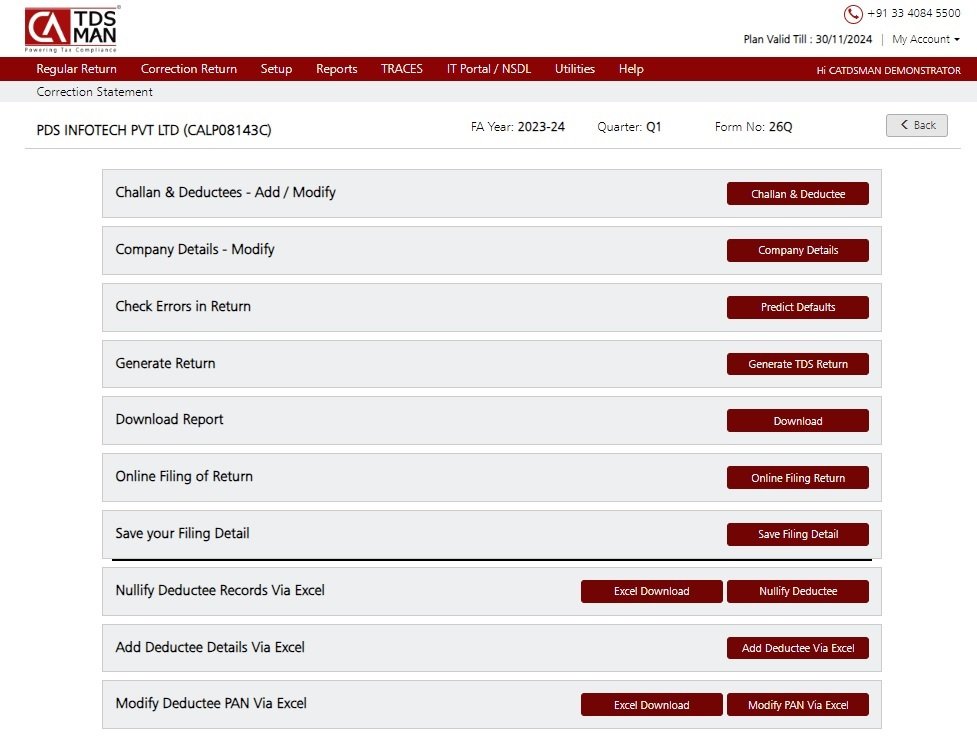
Following is displayed below:
The following steps will lead the user to generate the Correction Return correspondingly.
Challan & Deductees – Add / Modify: In this step user can get access to two options.
Challan & Deductee – Using this option, user can modify Challan and Deductee information.
Company Details – Modify: – Using this option, user can edit or modify information regarding the Company.
Check Errors in Return – In this step, user can check all the possible errors in the returns using Predict Default option and can rectify the errors accordingly.
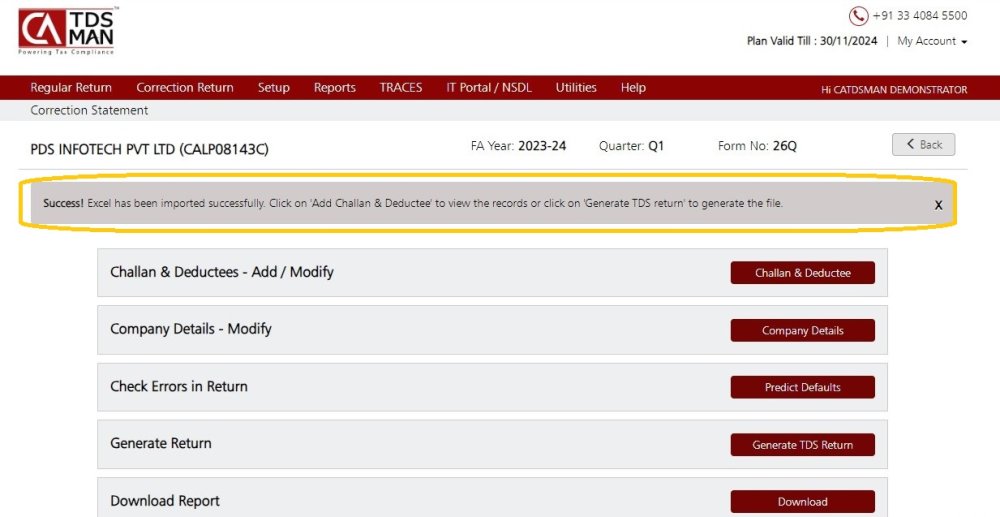
Generate Return – After making all the necessary corrections in company deductee data and ensuring that there are no defaults, the user is all set to generating correction return. Click on Generate TDS Return to proceed.
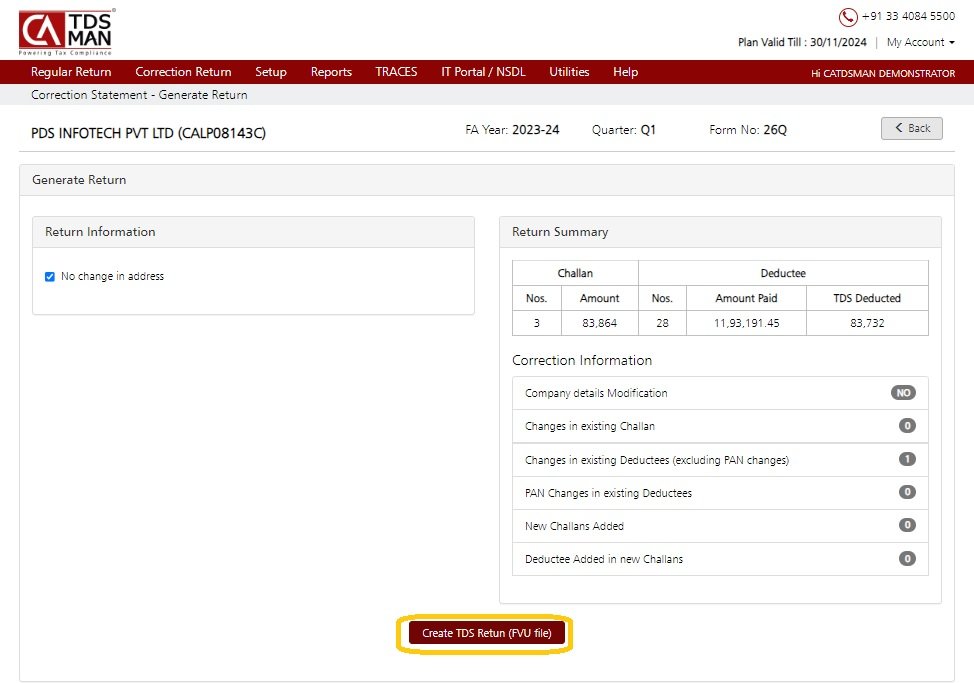
The following is displayed below:
As above screen shows, The Return summery after making correction is displayed. In case of change in address of company and the responsible person, it has to be specified.
The user needs to provide the CSI file through one of the following options:
- Income Tax Password
- Income Tax OTP
- Upload CSI Manually
Click on Create TDS Return (FVU File) to generate the return. Once the return is generated, one can download the ZIP File, containing the TDS FVU file. Form 27Acan also be viewed and printed from here. A copy of ZIP with all the relevant files will also be sent over email. The charges will be displayed for generating the return, this would be adjusted with the credit balance or the user has to pay the amount before the return can be generated. User can also submit the correction return offline through Aadhaar or DSC by consolidating the ZIP file in pen drive or CD.
Download Report – The user can download the Return report in PDF format, using this option
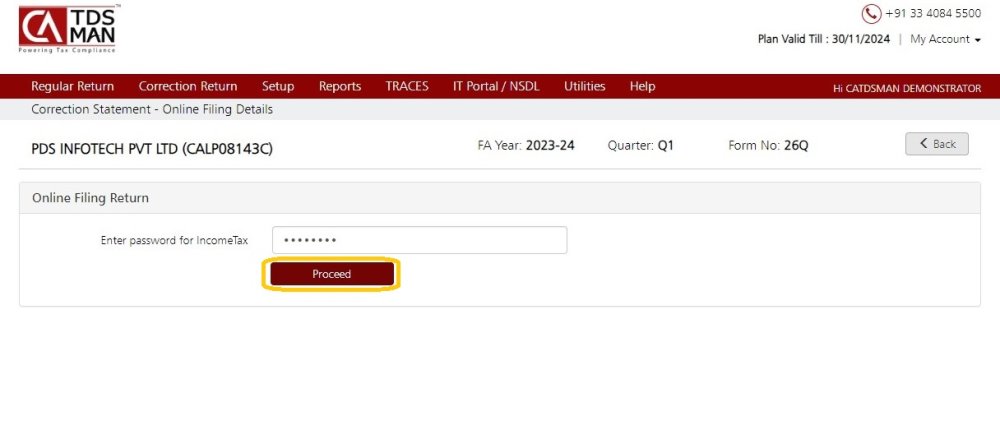
Online Filing of Return
The following screen will appear:
Financial Year – Select the Financial Year for which the Return has to be filed.
Quarter – Select the Quarter for which the Return has to be filed.
Form no. – Select the Form No. for which the Return has to be filed. In this case Form 26Q is selected.
Enter password for Income Tax – Enter the password for income tax for which the return has to be filed.
Click on Proceed to go further, as shown above.
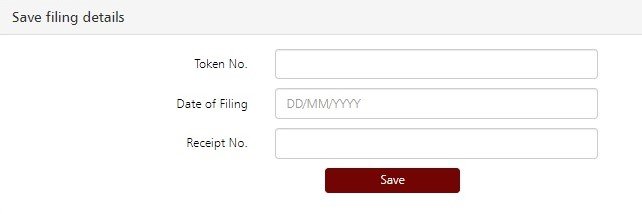
Save Your Filing Detail – The user can save their Return filing details using this option.
Click on ’Save Filing Detail’ . Enter the acknowledgement receipt details which are ‘Token No.’ ‘Date of Filing’ & ‘receipt No.’ and click on ’Save’ as displayed below:
Nullify Deductee Records Via Excel
For Correction Return, apart from Nullifying Deductees manually, it can also be done through Excel and get imported in the system. This would save effort in entering data through formats of the software interface.
Importing data from Excel can be done in 3 steps:
1. Export the desired record in the Excel sheet and store it in the desired location
2. Prepare the required data in this Excel sheet
3. Upload this data from the Excel sheet into the system
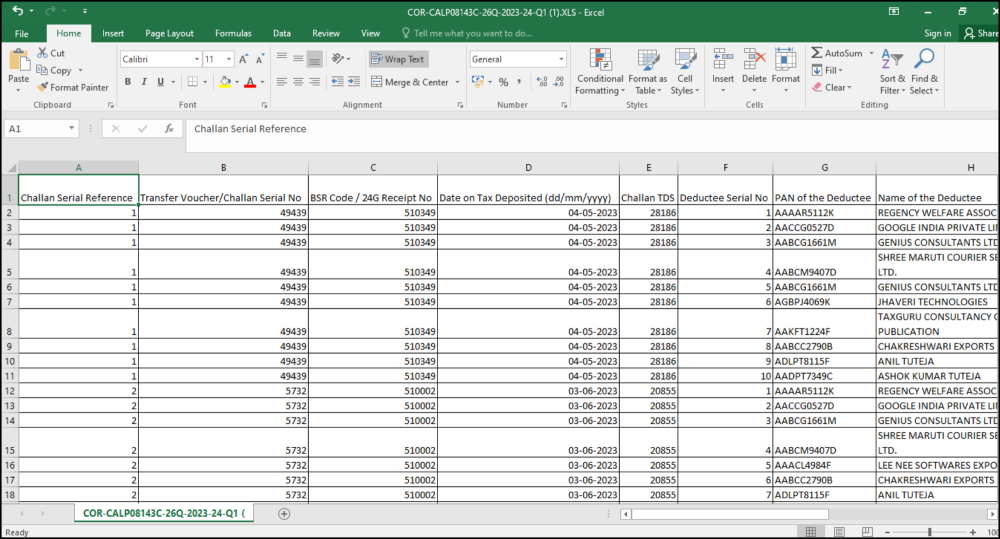
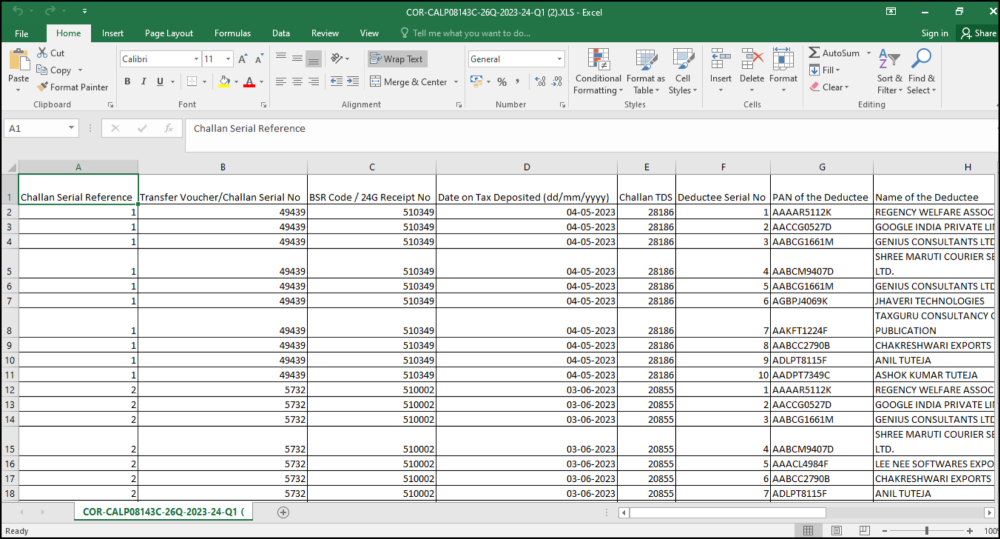
1. In order to nullify the data from Excel, first download the existing data in Excel format in the desired location.Click on ‘Excel Download’. The Deductee details of the selected correction return will get displayed as shown below;-
Prepare the data in this Excel sheet. Keep only those deductee records which need to be nullified. Remove all the other deductee records. Do not tamper any data in the Excel file.
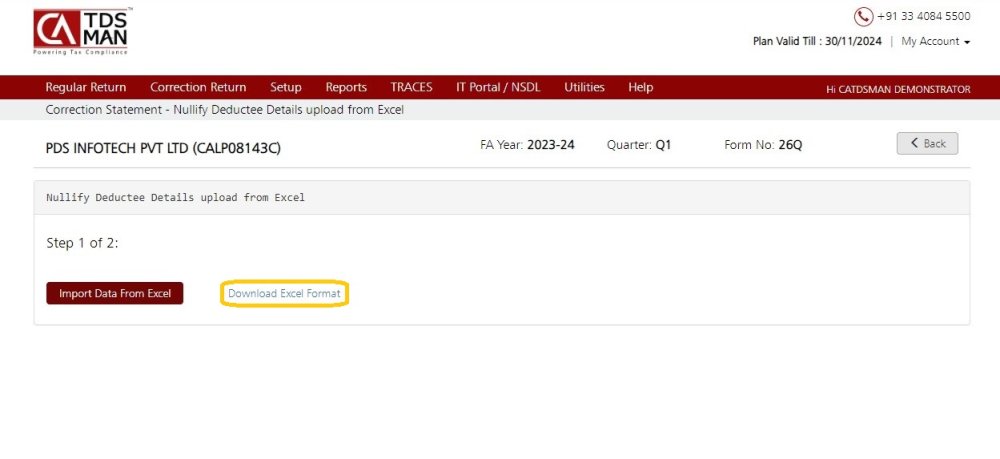
Click on ‘Nullify Deductee’.
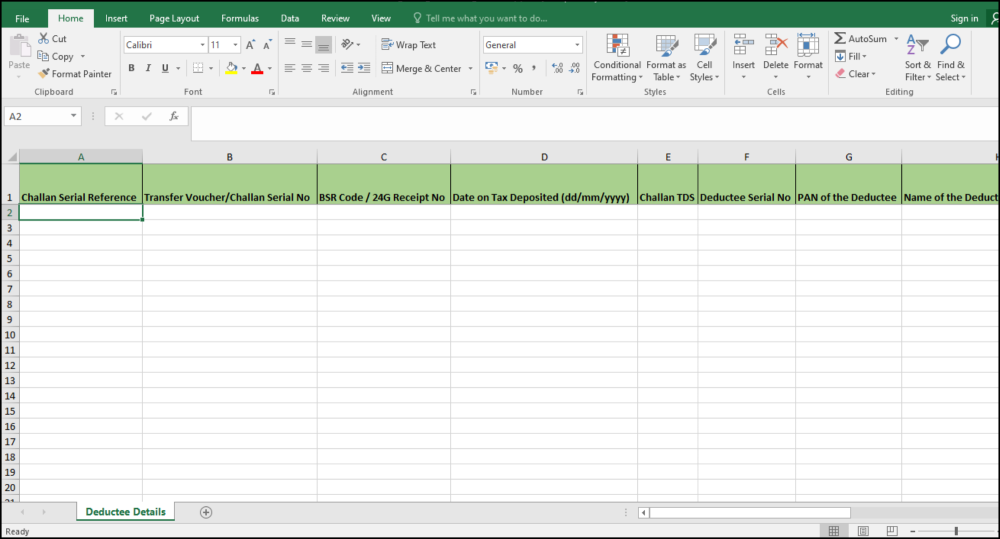
Click on ‘Download Excel Format’. A pre-defined blank Excel sheet will get Downloaded as shown below:
Copy the data from the previously saved Excel sheet into this blank Excel sheet and save this file. This file has to be imported into the system as explained below.
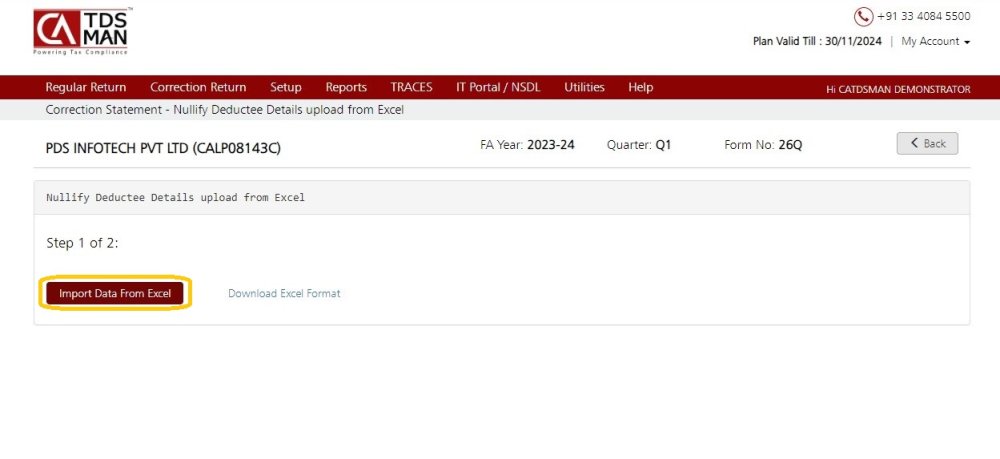
Click on Import Data From Excel
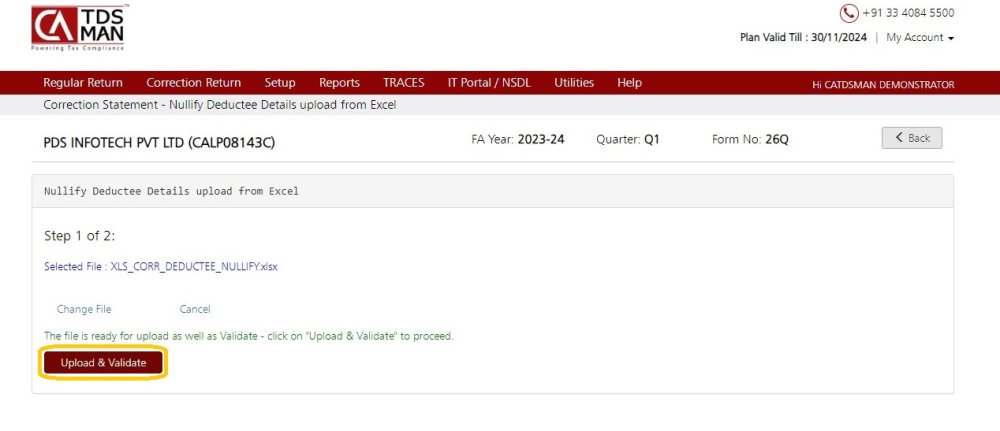
Upload and Validate the above Excel file into the system.
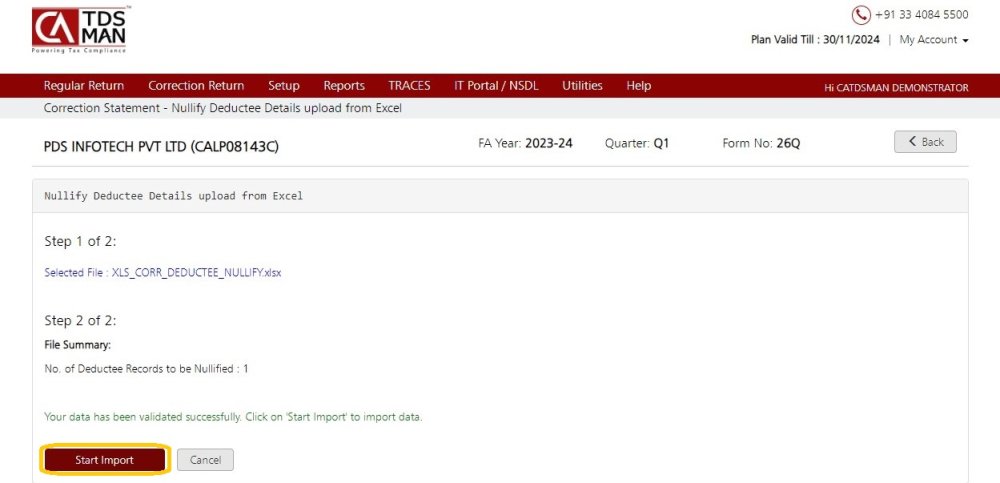
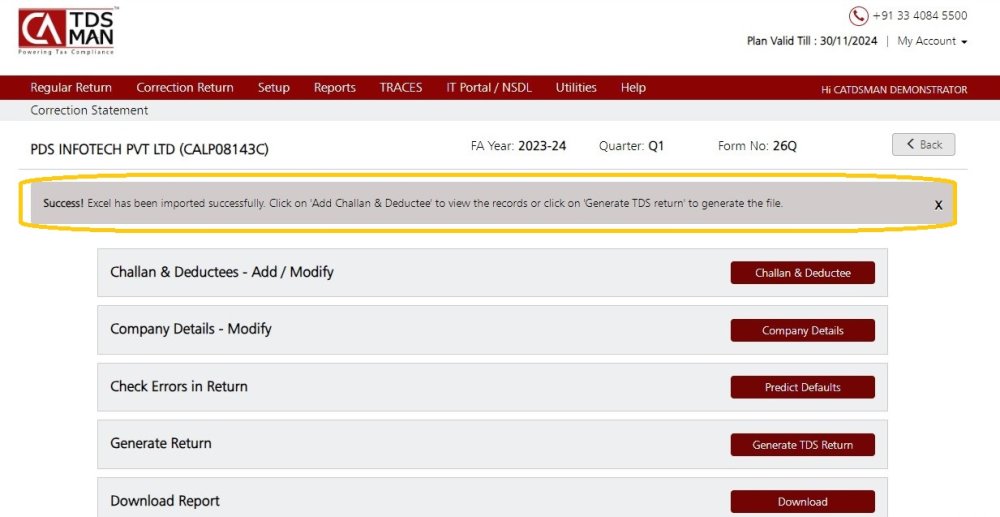
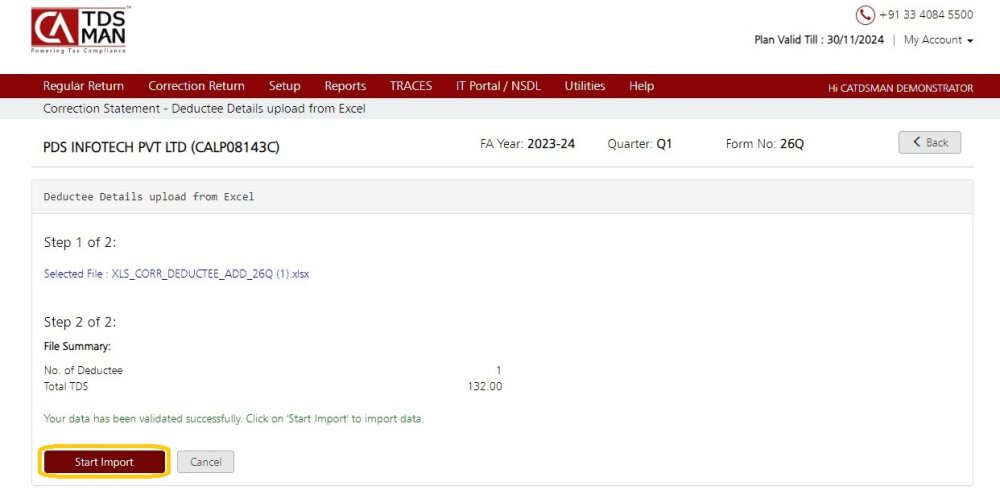
Once validated, click on ‘Start Import’. The data from the Excel sheet will be imported into the system.
Add Deductee Details Via Excel
For Correction Return, apart from the manual creation of the Deductee, it can also be imported into the system through Excel and can be added to the list that is already present. This would save effort in entering data through formats of the software interface.
Importing data from Excel can be done in 3 steps:
1 Download the pre-defined blank Excel format in the desired location
2 Prepare the required data in this Excel sheet
3 Upload this data from the Excel sheet into the system
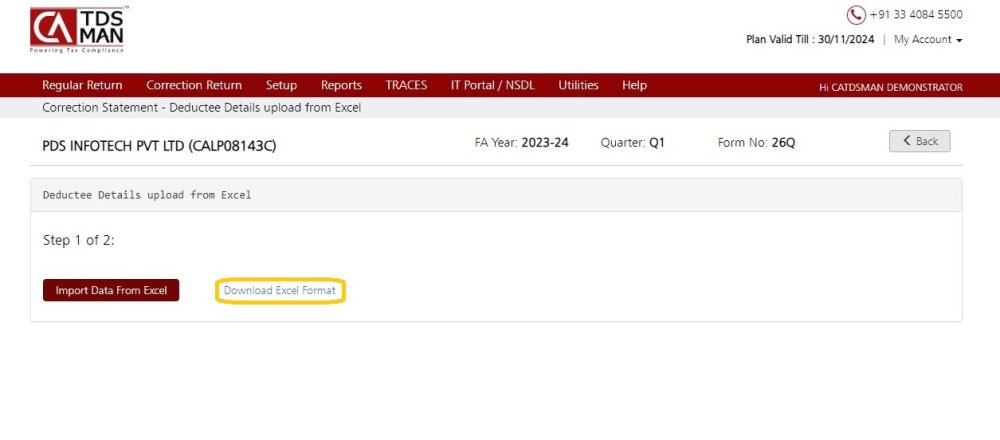
Click on ‘Add Deductee Details Via Excel’. The following screen will appear:
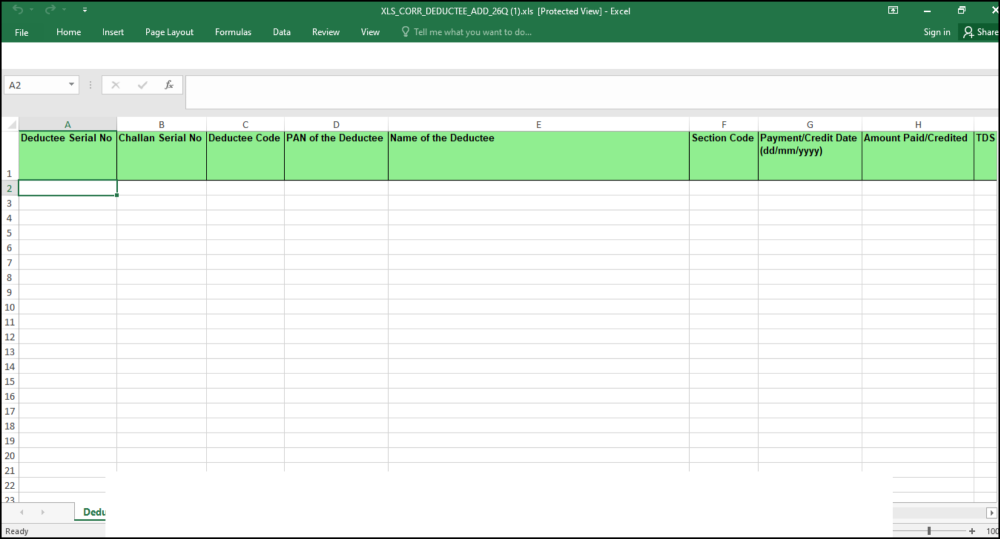
To import the data from Excel, first download the pre-defined Blank Excel format in the desired location. Click on ‘Download Excel Format’. The following screen will appear:
Prepare the Deductee data in the blank sheet and make sure about the following:
i. For each deductee the correct Challan Serial Number should be specified in the Excel Sheet.
ii. Make sure the Challan Serial Number is present in the challan details.
Save this Excel Sheet.
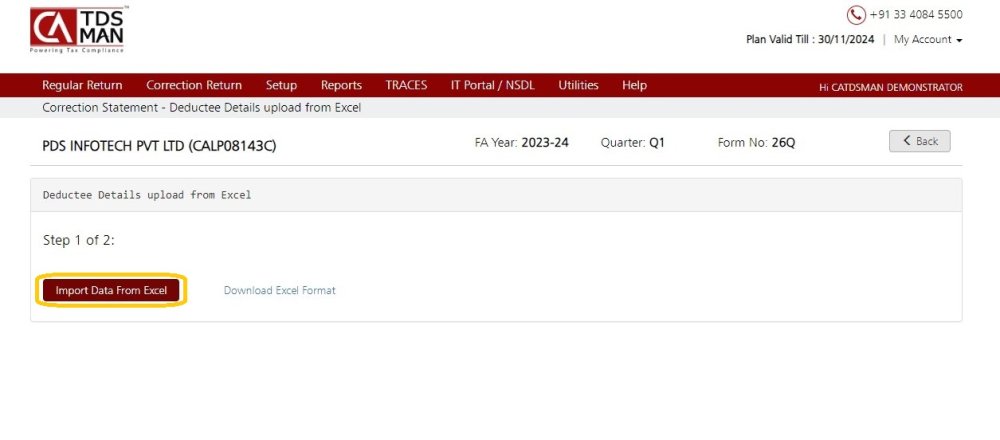
In order to import the data from this Excel sheet, click on – ‘Import Data from Excel’
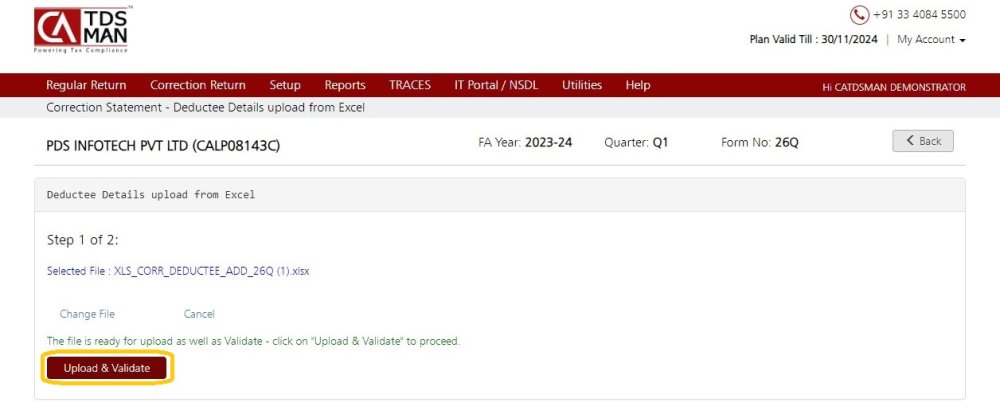
Click on ‘Upload and Validate’
Click on ‘Start Import’.
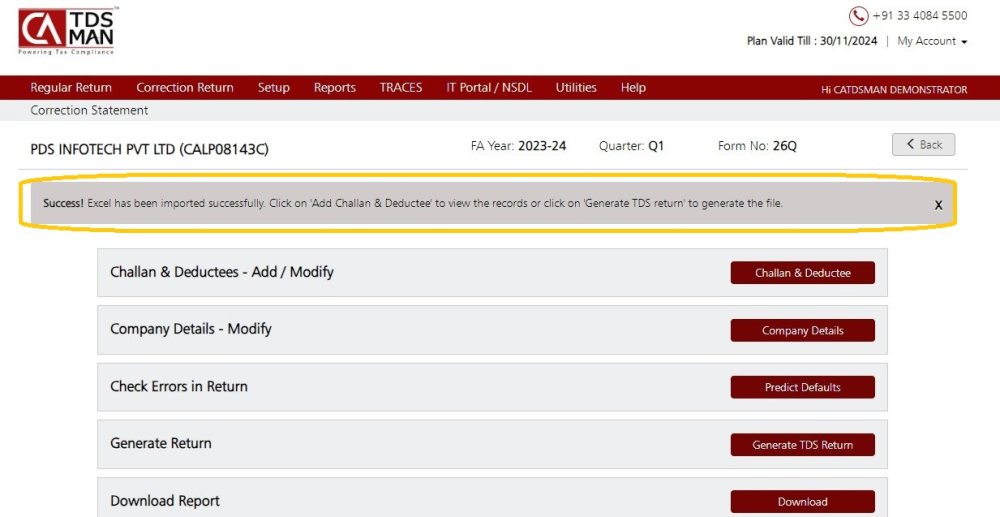
Excel Has been imported successfully.
Modify Deductee PAN Via Excel:
For Correction Return, apart from manual modification of the PAN , it can also be modified through Excel and get imported in the system. This would save effort in entering data through formats of the software interface.
Importing data from Excel can be done in 3 steps:
1 Export the desired record in the Excel sheet and store it in the desired location
2 Prepare the required data in this Excel sheet
3 Upload this data from the Excel sheet into the system
Click on ‘Excel Download’ The Excel sheet with all the relevant records will get downloaded as shown below:
Save this Excel sheet in as desirable location.
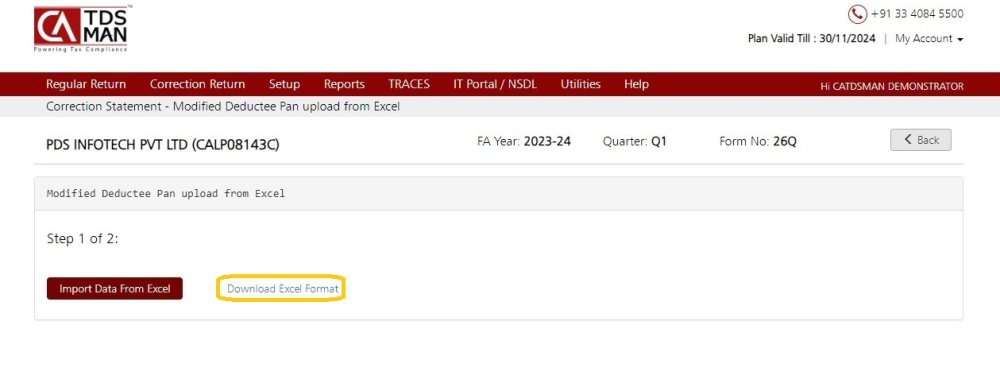
Click on ‘Modify PAN via Excel’
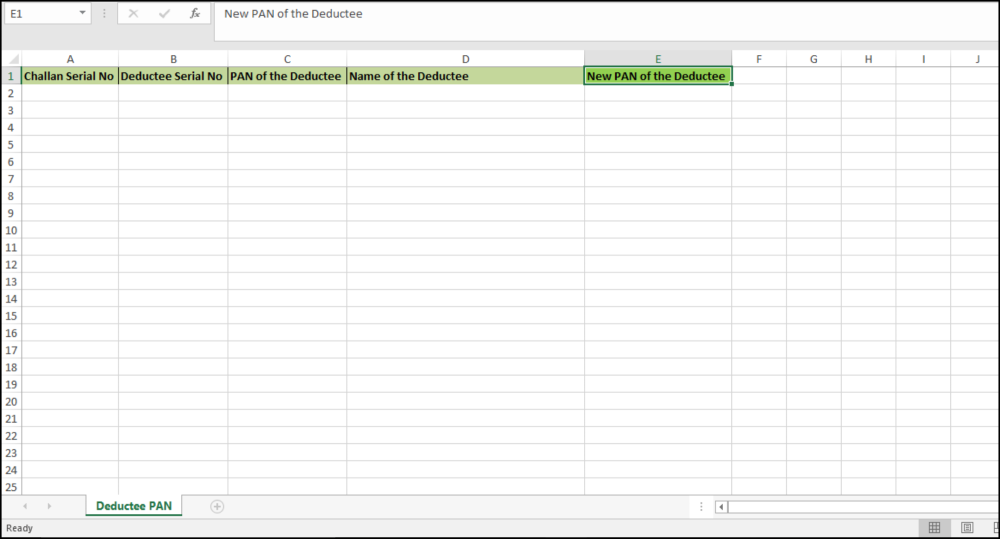
Click on ‘Download Excel Format’. A Pre-defined blank Excel format will get downloaded as shown below:
Prepare the PAN Modification Data in the Pre-defined blank sheet, make sure about the following:
The ‘CD serial no.’ , ‘DD Serial no.’ ,’PAN of Party’ , and ‘Name of Party’ as per Justification Report need to be placed in the Excel Sheet and the correct PAN under ‘NEW PAN’ has to be entered for each Record.
To import this data into the system enter the Excel file path from which the data has to be imported.
Color coding in Excel for error (this may take a few more minutes) – If there is any error in the data provided in the Excel sheet, the system will highlight the same. The user is expected to rectify the data and import the entire file again. To display these errors using the color code, check this box.
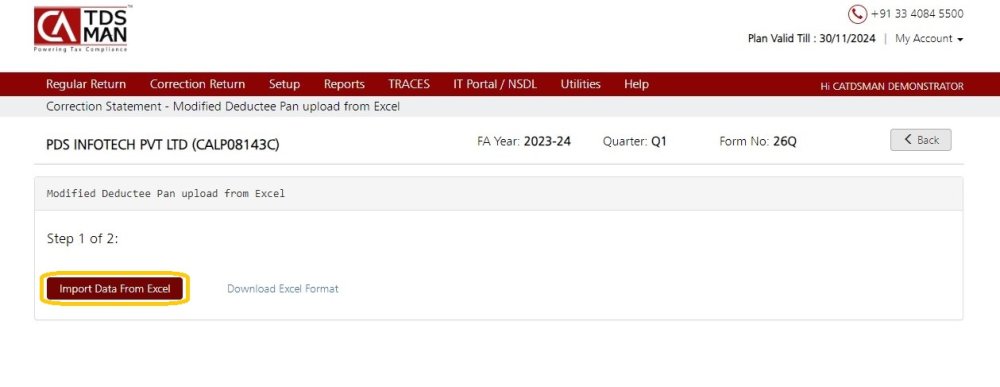
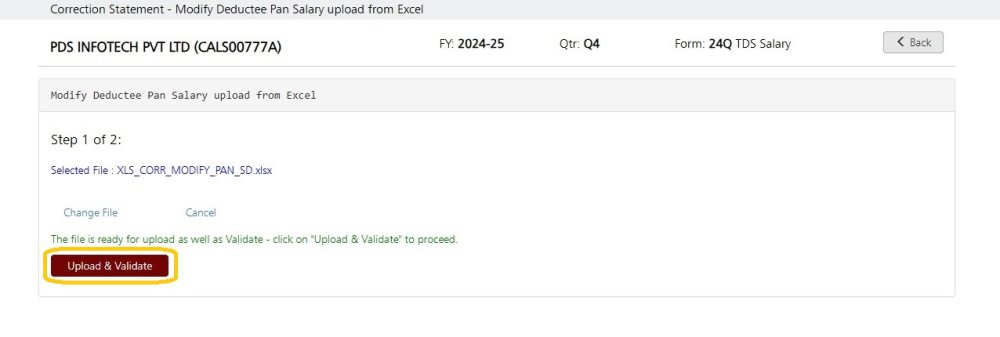
Click on ‘‘Import Data from Excel’.
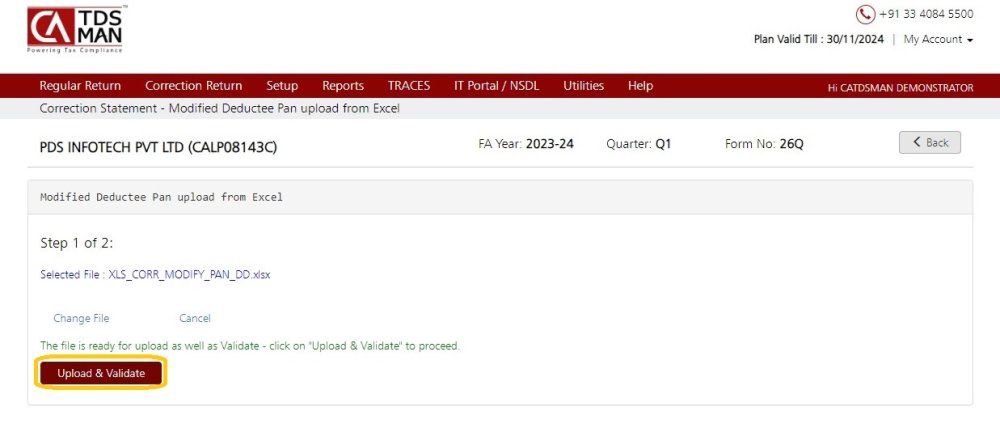
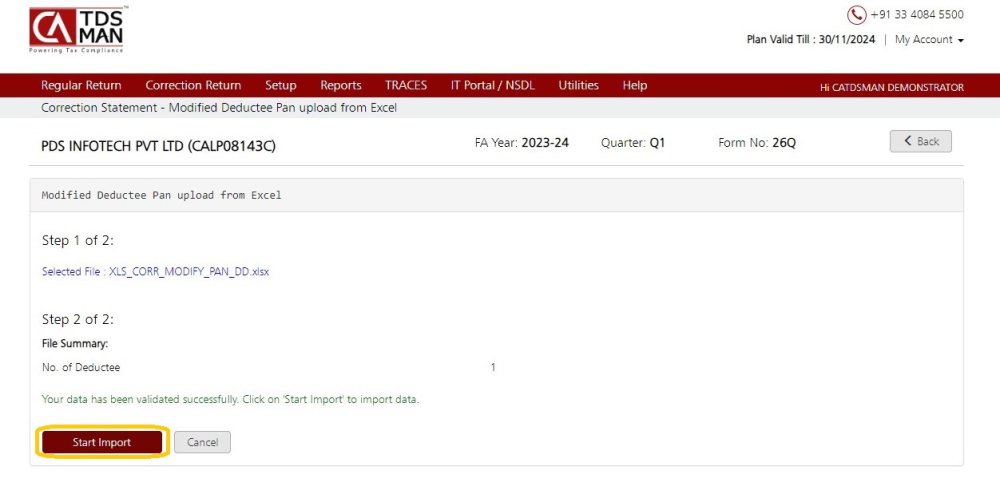
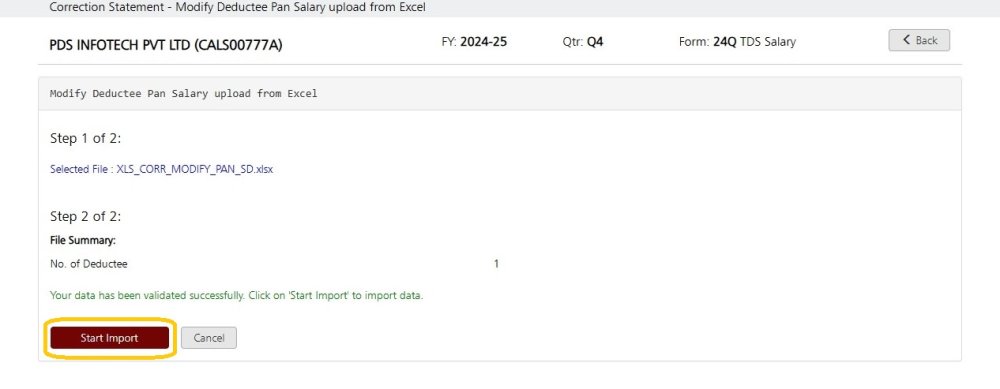
the system will validate the Excel data. If the data is correct then the following screen will appear :
Click on “Start Import”. The data with the modified PAN will get imported into the system.
In case, there is any error in the data, the system will highlight the errors. The errors have to be rectified and the Excel sheet has to be imported again.
Excel has been imported successfully.
Add Salary Details Via Excel For Correction Return
For Correction Return in Salary details, apart from the manual creation of the Employee, It can also be done through Excel and get added to the list already present. This would save effort in entering data through formats of the software interface.
Importing data from Excel can be done in 3 steps :
1. Download the pre-defined blank Excel format in the desired location
2. Prepare the required data in this Excel sheet
3. Upload this data from the Excel sheet into the system
Click on ‘Add Salary Via Excel’
The following screen will get displayed :
Download the blank Excel file and save it in the desired location.
Prepare the Employee data in the blank sheet, make sure about the following :
- Do not repeat the entries already present in the Return
- Enter correct value in the calculative fields
Click on ‘Import Data From Excel’. Enter the Excel file path from which the data has to be imported.
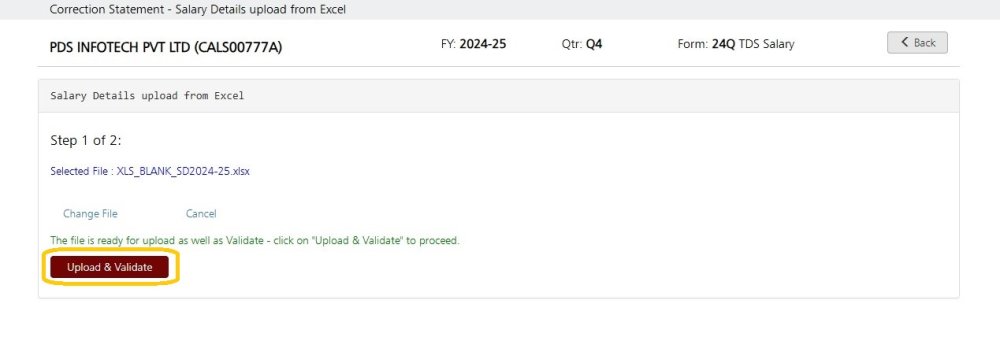
Click on ‘Update & Validate’ button.
The system will validate the Excel data. If the data is correct then the data can be imported in the system.
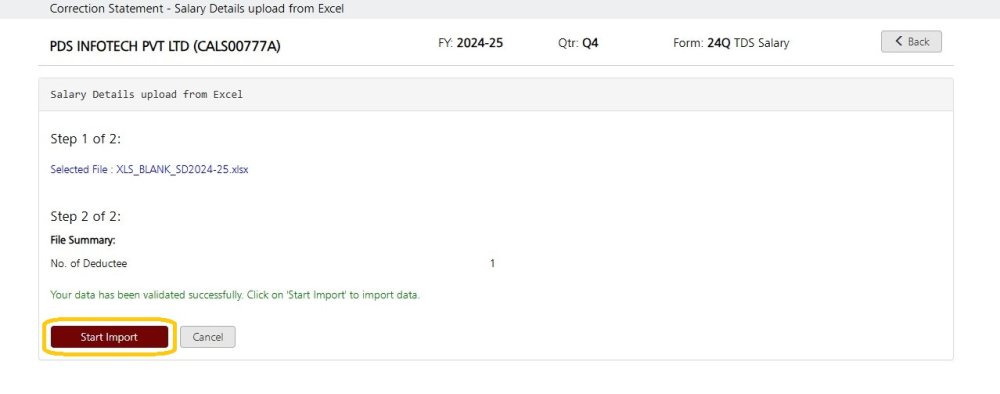
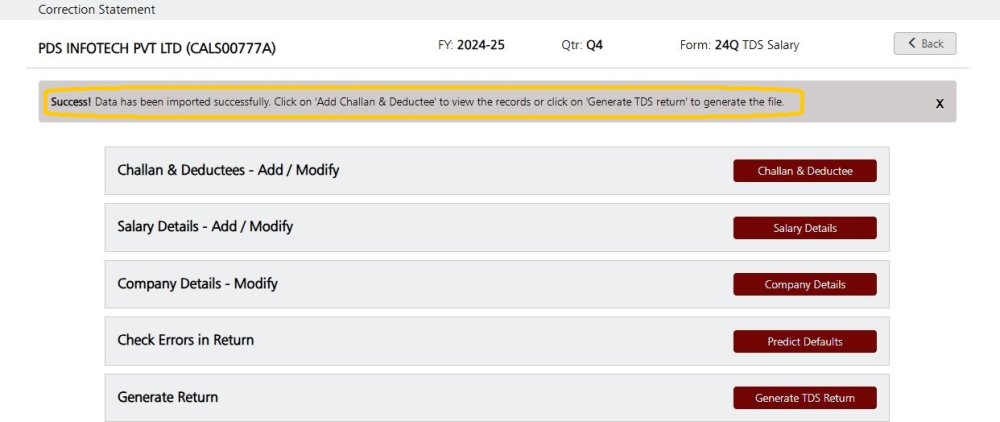
Click on ‘Start Import’ button The data will get imported into the system.
In case, there is any error in the data, the system will highlight the errors. The errors have to be rectified and the Excel sheet has to be imported again.
Delete Salary Details Via Excel For Correction Return
Deletion of Salary details via Excel can be done in 3 steps :
1. Export the desired record in the Excel sheet and store it in the desired location
2. Prepare the required data in this Excel sheet
3. Upload this data from the Excel sheet into the software
Click on ‘Delete Salary Via Excel’
The following screen will get displayed :
Click on ‘Download Excel Format’.
Prepare the data in this Excel sheet. Keep only the relevant data. Remove all the other employee records. Once the data is prepared as per requirement, click on ‘Import data from Excel’.
Click on ‘Upload & Validate’
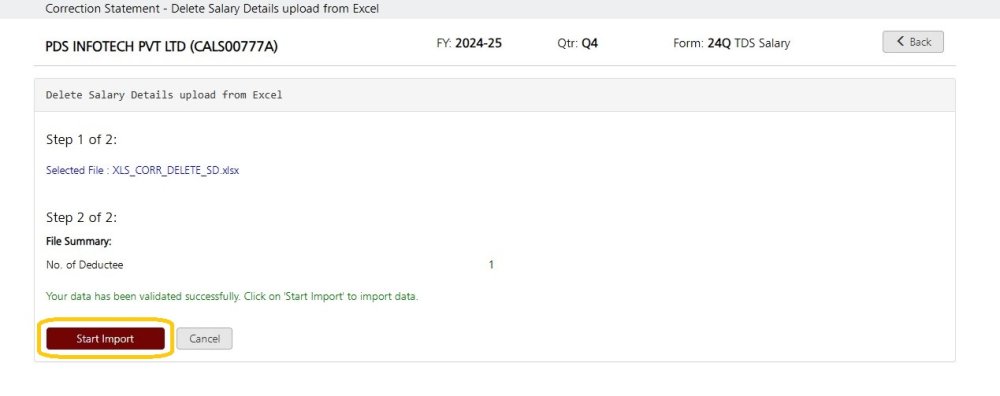
The system will validate the Excel data. A new nullified record will get added against each deleted record.
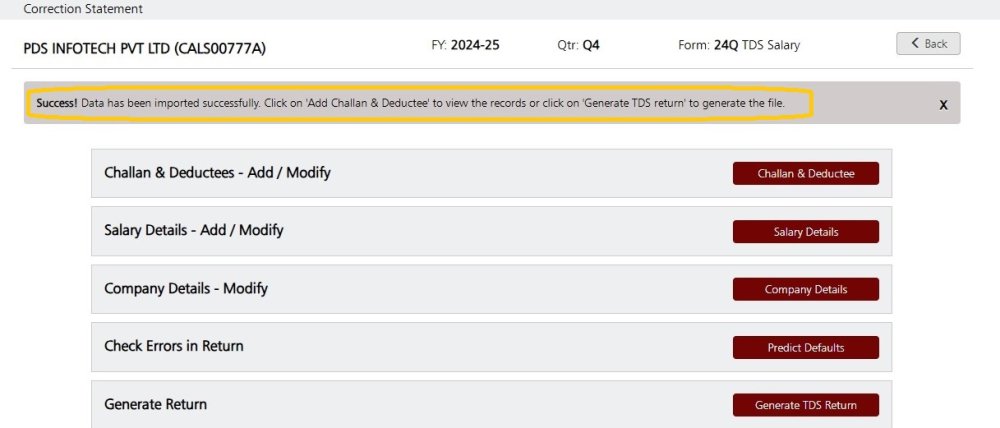
Click on ‘Start Import’ button The data will get imported into the system.
In case, there is any error in the data, the system will highlight the errors. The errors have to be rectified and the Excel sheet has to be imported again.
PAN Change Via Excel For Correction Return
For Correction Return of the salary details, apart from manual modification of the PAN of Employee, it can also be modified through any of these two different formats either Excel and get imported into the system. This would save effort in entering data through formats of the software interface.
Importing data from Excel can be done in 3 steps:
1. Download the pre-defined blank Excel format in the desired location
2. Prepare the required data in this Excel sheet
3. Upload this data from the Excel sheet into the system
Click on ‘PAN Change Via Excel’
The following screen will get displayed :
Click on ‘Download Excel Format’
Prepare the PAN Modification Data in the Pre-defined blank sheet, make sure about the following:
The ‘SD No.’ , ’PAN of the Employee’ , and ‘Name of Employee’ as per Justification Report need to be placed in the Excel Sheet and the correct PAN under ‘NEW PAN’ has to be entered for each Record.
Click on ‘Import Data From Excel’
Click on ‘Upload & Validate’
Click on ‘Start Import’
In case, there is any error in the data, the system will highlight the errors. The errors have to be rectified and the Excel sheet has to be imported again.
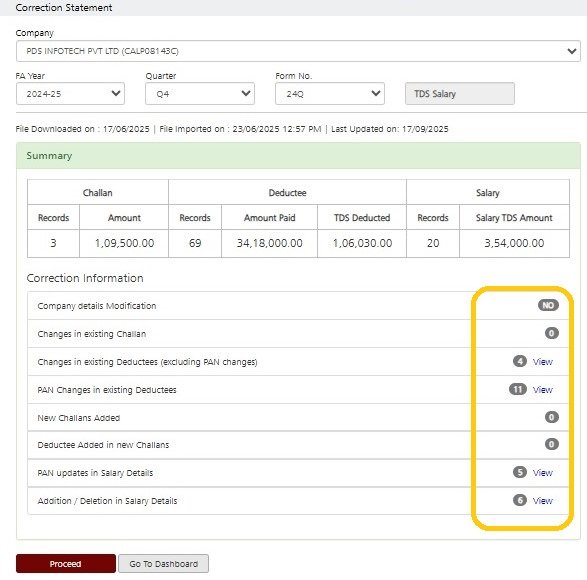
Correction Information
Whenever a correction statement is fetched, the summary of all the earlier corrections made in this statement gets displayed. Click on the Correction return you want to view the Correction information , following screen will show :
Company Details Modification
If there is any change in the company details then will show ‘Yes’ and there will be a ‘View’ button adjacent to it so that the details can be viewed.
In this case there are no changes so it is displaying ‘NO’.
Changes In existing Challan
If there is any change in the existing challan then the system will display the number of challans in which changes have been made and there will be a ‘View’ button adjacent to it so that the details can be viewed.
In this case there are no changes so it is displaying ‘0’.
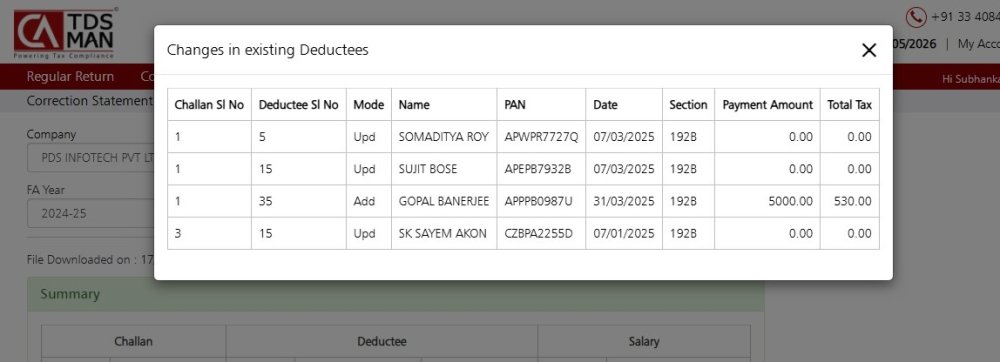
Changes in existing deductees (excluding PAN)
If there is any change in the deductee details, excluding the changes in the PAN, then the system will display the number of deductees in which changes have been made and there will be a ‘View’ button adjacent to it so that the details can be viewed.
In this case there are changes in 4 deductees so it is displaying ‘4’. Click on ‘View’ the details will get displayed as shown below:
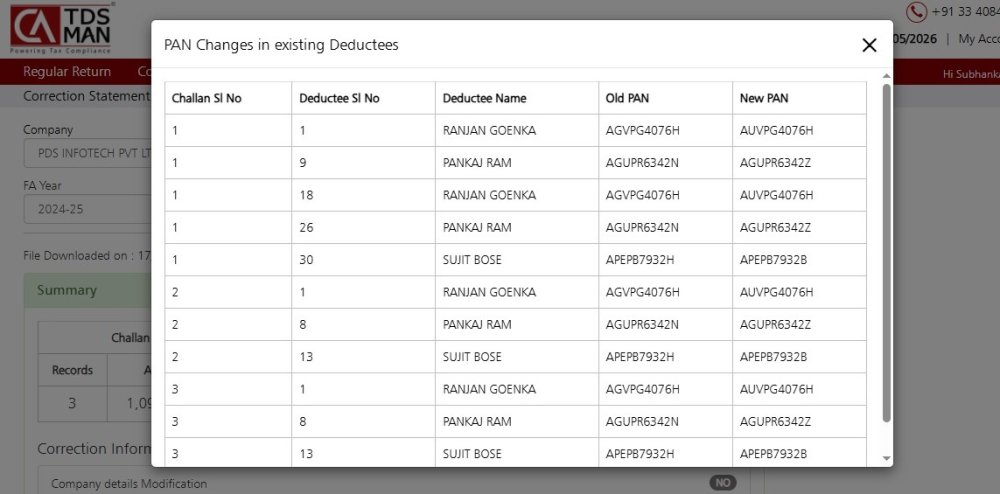
PAN Changes in the Existing Deductees
If there is any change in the PAN of the deductee, then the system will display the number of deductees in which changes have been made and there will be a ‘View’ button adjacent to it so that the details can be viewed.
In this case there are changes in the PAN of deductees so it is displaying ‘11’. Click on ‘View’ the details will get displayed as shown below:
New Challan added
If there is any new challan(s) added, then the system will display the number of challans which have been added and there will be a ‘View’ button adjacent to it so that the details can be viewed.
In this case there are no new challans added so it is displaying ‘0’.
Deductee added in New Challans
If there is any deductes added in the new challan(s), then the system will display the total number of deductees added across all the new challan(s) and there will be a ‘View’ button adjacent to it so that the details can be viewed.
In this case there are no new deductees added so it is displaying ‘0’.
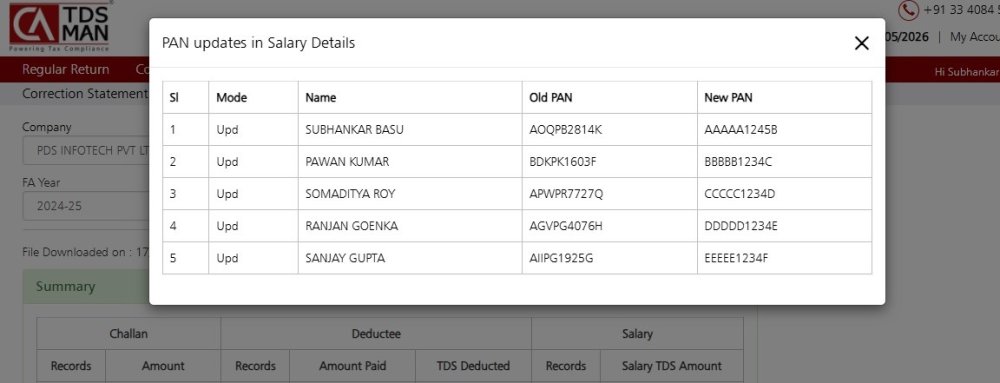
PAN Update in Salary Details
If there is any update in the PAN of the salary details, then the system will display the number of PAN in which updates have been made and there will be a ‘View’ button adjacent to it so that the details can be viewed.
In this case there are changes in 5 PAN of salary details so it is displaying ‘5’. Click on ‘View’ the details will get displayed as shown below:
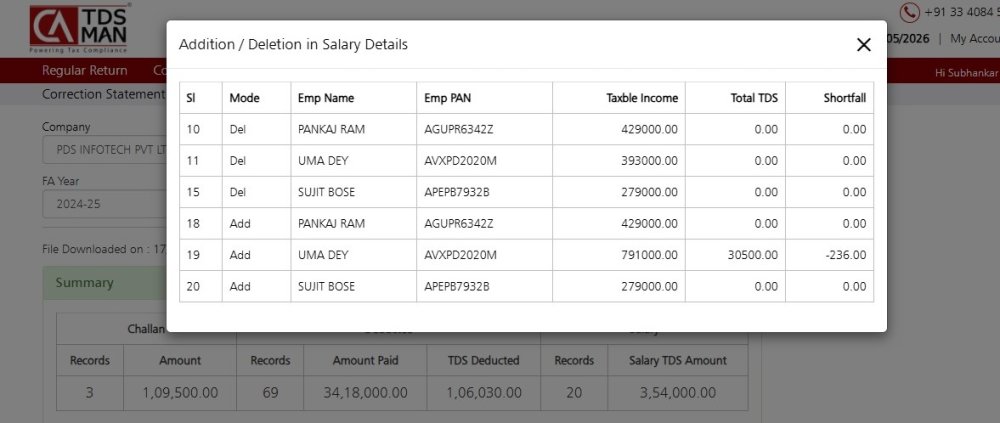
Addition / Deletion in Salary Details
If there is any addition / deletion in the salary details, then the system will display the number of Salary details in which addition /deletion have been made and there will be a ‘View’ button adjacent to it so that the details can be viewed.
In this case there are addition / deletion in 6 salary details so it is displaying ‘6’. Click on ‘View’ the details will get displayed as shown below:
Need more help with this?
CA-TDSMAN - Support


